Tuesday, March 28, 2023

It works! - Nay it disney!!!

The first soldering kit I have ever attempted, a little two dollar unit from the far off lands, I bought it a year ago, so I decided to hone my soldering "skills" for an hour, and it was an hour or more, and when all was done and dusted, the unit worked...

Keen eyes out there may notice there is a capacitor missing from the photo, more on that later.

I'm showing the best side, the soldered side is better left alone. When connected to five volts eight out of the ten LEDs did what they were supposed to do, react to sound via the onboard microphone, and two did not do anything. I saw it as a win, not a total win, but 90% success is what I call great for my first, nervous, time.

Later on in time, I noticed from the above photo that the top left pin of the circuit chip was not making contact, so 15 pins out of the 16 had good contact, this was the probable cause of the two LEDs not doing what they were supposed to, however, in between the two points in time, I screwed something else up, typical...

I was taking a look at the two LEDs that were not working, perhaps I had put them in backwards, a sound reason for LEDs not making light, but as I was checking, I cracked the smaller capacitor solder joints, and for the life of me, over the next fifteen minutes or so, I could not resolder them back, the minute tinned pads on the poor quality circuit board were gone.

I think that is a common problem with the circuit boards for these very cheap kits, but it is also a problem with people like me, who cannot solder for toffee, spending far too long with heat on the pads, basically removing any possible contact points, I will reset and learn, and order another one of these kits from distant lands.

So, it was (almost) working, and now it does not, probably a familiar tale over the next few attempts at learning to solder better. I have learned a lot from this first kit, eyesight could be better, dexterity too, patience can be improved and getting things right the first time would be a good idea.

Nothing ventured, nothing gained.

Sunday, March 26, 2023

Inside a Radio Shack 22-032A battery meter

Another handy little meter that I've had for years, so I thought I would take a look at how it ticks. This follows on from my previous comments about multimeters that have battery testing capability and basically there is a difference between the two devices. Testing a battery purely by voltage is not a reflection of the battery health, so it is important to place the battery under load to check. In the case of a battery meter like this one, that is achieved by turning the dial which places an appropriate resistance in the test circuit.

Inside, no battery is needed as the unit uses the tested battery to provide current. I expected to see the calibrated, analog moving coil meter of course and a series of resistors linked to the rotary dial positions, that would be about it I would think, no fancy integrated circuits, just an application of good old fashioned V=IR in a handy little unit, so I took the back off to have a fiddle around. 
As predicted, twelve resistors (for nine dial positions) and annoyingly, some resistors are in backwards in relation to others, so it makes interpreting the bands a little difficult. I checked all the resistors with a multimeter and they were approximately what they should be, within reason. Instead of making a list of the resistors (and their variance from the stripes) I made a table of dial position and resistance recorded at the probe level for both the Neoteck and Klein Tools multimeters.


The dial position selects a resistor, or group of resistors and then the magic of V=IR comes into play for the moving coil meter and full scale deflection if the loaded battery is good, there is some other aspect coming into play for the button cells and AAA and AA cellls, but I was unwilling at this time to remove the meter label or the circuit board to see what jiggery-pokery is happening on the reverse side with the traces and perhaps a couple more resistors, or reuse of one of the twelve. I was tired and I needed a beer and there was also that chance that I would not be able to put it back together again and it would be a battery meter no more.

Suffice to say, clever, yet simple device, it is a shame that Radio Shack no longer exist in the form that they did a decade ago, but there were similar devices branded Micronta in the years that followed their closure and transition into the Source.
 

Thursday, March 23, 2023

Multimeter musings, Part Two

The second multimeter review, of sorts, is regarding the second multimeter that I bought perhaps a decade or more ago, and this too has a "name brand" associated with it, but in essence is another of the peripheral peripherals away from the key players. If you take a moment to peruse any online marketplace, you may be shocked to see how many options there are, and if you journey to the Chinese markets, the amount of options triples, but fundamentally, most of the cheapo options are the same thing. I have ordered such a device for the princely sum of $4.91 which includes everything, including delivery by the most excellent, slowest, method.

Enough of that, here is the subject of todays lighthearted investigation:

It was about $25 back in the day, the brand is Innova Equus, model 4320. I think I bought it at around the time when I replaced the O2 sensor on the car, I had bought an Innova CanOBD2 Diagnostic tool, so it was a happy acquisition time. The manual on this one is rather better, a readable font, that is all we can ask for, and clear instructions, except for that big green block called BAT load test, I must be missing some brain cells because it does not appear to work...

The way to test a battery is not just to check the voltage, because often, a depleted AA battery can still show up to 1.5V but that will drop if a 100ohm load is in the circuit I was excited about another way to test batteries, but this multimeter seemed to ignore my excitement. I followed the manual, had the leads in the right place, turned the dial and the display always says the same thing regardless of connection to batteries, I assume that the resistance is on a dry joint within the casing, so I give up on that and use my battery tester instead.

Comparison of the Innova with the Neoteck. The orange rubber bumber will actually fit on both, but I prefer it on the Neoteck. You will see that the common post is central on the Neoteck and on the right hand side of the Innova, that is fine I suppose as long as you remember, on the expensive Fluke meters, it is usually in the middle. 

There is a 250V 315mA fuse on the back of the circuit board and a familiar brass rail shunt. The fuse is easily accessible and in a clip type holder, far better arrangement than the Neoteck.

The other side of the circuit board shows better quality control, although not so much for the BAT testing circuitry I suppose, if I was more skilled at this electronics game I should be able to troubleshoot, but I expect at my level, I would end up making things worse, so I will leave it alone. The beeper is far better on this one, the overall impression is that there are better solder joints, no evidence of flux all over the show, a better display housing, held on with 4 screws so it would take more of a drop I expect, the test lead posts are quite sturdy and better material, overall an improvement on the Neoteck.
In terms of the multimeter standings, the Innova quality is better than the Neoteck, so for that, number two is in first place, and number three in second place, but there is a however.

The Innova is let down by the flawed BAT feature, I know I am sort of going on about it, but that represents 30 degrees of the dial real estate, this could be chased down, especially now I have two digital multimeters, however I choose to live without battery testing on this unit. There are aspects of the Neoteck that I like, the rubber bumper, the crocodile clip leads, but I wonder in a decades time, because of build quality, will it still be as useful as the Innova.

As they say, only time will tell.

Wednesday, March 22, 2023

Multimeter Conversations, part one

 In 1984 a group of us working at APPH, the landing gear factory, perused an electronics catalog and we saved on postage by buying things together, it was a wonderful day when things arrived and I was in possession of my first analog multimeter. I may do a blog on that one, later.

This blog will be about the third multimeter, recently purchased, and these conversations will be a review of the state of things out there in the market, because quite frankly, the multimeter market is a complete shambles and I hope to shed some light on that. However, multimeter number three is a reasonable surprise, and I know for sure that it is going to be better than a recently ordered multimeter number four and possibly a lot worse than multimeter number five, although because of timing and locality, five will probably be four.

Anyways, back to number three.

It was ordered from Amazon and was featured as a "warehouse deal" which means it had possibly been a customer return, the original "new" price, with shipping and taxes, being $31.35 and the "used" price was $22.08 so I thought, for shits and giggles, I would order it as a backup to my aging cheapo multimeter from a decade ago (multimeter number two) plus there were also crocodile clip leads included, which I wanted for my electronics studies.

It arrived, but was dead as a dodo, however, I quickly found that it was the included nine volt battery and replaced it, all was good, but I thought I should contact Amazon customer service and have a grumble. I have found that with the big companies, grumbling is often a satisfying way to reach a state of ungrumble, so with fair difficulty I ended up in online chat with a representative with a distinctive foreign sounding name.

After quite a short whinge, the chap said I could return it, free of charge, or if I chose, a partial refund would be given, so I picked the latter and he awarded me a twenty percent refund of $4.40 and asked if that was satisfactory, I said yes, and then to my surprise he also gave me a $5.00 courtesy credit for any future purchases. Therefore, when all the dust settled, multimeter number three ended up costing a whopping $12.68 and that definitely ticked off the shits and giggles box.

The innards :

The little motherboard is not that bad, most of the solder joints look fine with some voids, perhaps some are a little dull and the cleaning process, to remove any excess flux, left much to be desired. There are a couple of fuses, one glass 250V 200mA glass quick blow fuse in an interesting, soldered holder that will be a challenge to replace and a surface mount zero ohm resistor "fuse" or trace jumper as an overcurrent protector. Then the "brass rail" on the right hand side is a shunt so that the microprocessor can calculate amperage when the test lead is in the 10A socket.    

As usual with these Chinese testers, there is the epoxy "blob" on the left hand side there, that is the microprocessor that does all those basic electronic calculations based on lead input and selector position, just the basic formulae that we learned at trade school with mostly acceptable accuracy.

Overall multimeter three is of reasonable quality, materials are ok, soldering is fair, features are ok and I expect for the price, that is acceptable for a little hobby unit, the little manual, with the smallest font known to man, not so much when you have ancient eyes like mine. As for longevity, well it will be used for my light electronics, arduino and breadboard use, so no danger there, will I be using this one to test mains voltage?, well highly unlikely, I will not be sticking those test leads into any receptacle because I suspect that magic smoke may appear and possibly the smell of cooking bacon could be a possibility. 

Tuesday, March 7, 2023

The first Kaby Lake machine, a bridge not far enough

The first week of March has vanished...

I originally bought this case about 18 months ago, time indeed has been vanishing at an alarming rate. I blogged about an ASRock B450M build that had many issues because of the motherboard and incompatible or dodgy ram, so for that time the case was shelved, unwashed, unwanted, a case without a heart, but with promise.

The ASUS Z270M mATX motherboard that I bought a couple of weeks ago, but not told you about, was the perfect size for this little case, it included a seventh generation Intel i5-7500 processor and stock fan. The level of processor, nickname Kaby Lake, inhabits the same LGA1151 socket as the previous Skylake generation, so this motherboard allows for both generations and supports DDR4 memory. The differences between the Skylake and the Kaby Lake are probably important to Intel, but performance wise for the rest of us, let us just assume that with typical tick-tock shenanigans, the newer generation processor will be about ten percent faster.

I heard you ask "faster that what?" so I will reply "Yes, exactly"

It matters not, because all I want to do is have some fun, and you know, oddly, I have a feeling that I'm not the only one. The only fly in the ointment on the motherboard deal was that it did not have an IO shield, so a few weeks back I ordered one from eBay and the postman brought it yesterday.

Although this case was thirty-four dollars, which by todays post-plague standards is an absolute bargain, it is however a little flawed in design for building a classic computer. That front panel is not a door, there is no provision whatsoever for an optical drive, the top of the case has a magnetic dust mesh, which struggles to stay in place, and the second mesh, below the power supply, wriggles like a dachshund in a sausage factory whenever the case is moved. The other issue is that the motherboard standoffs have slight tolerance issues, so not all mounting screws could be used.

However, it is a case to store stuff in and occupy my time here in the laboratory.
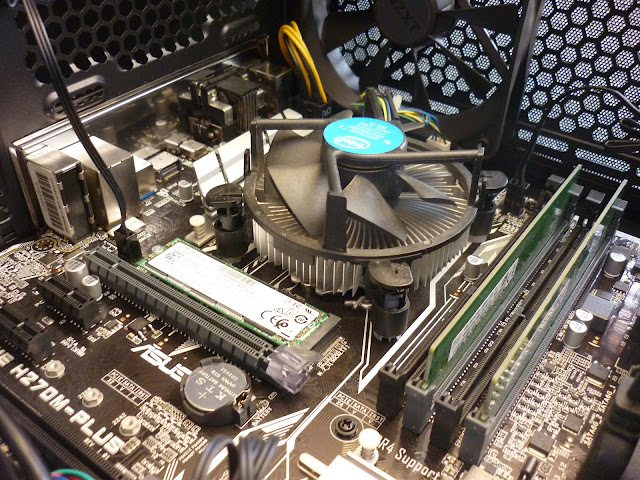
You will see to the left of the CPU cooler fan there that I installed a 128GB M.2 NVMe boot drive onto which I stuffed the (free) Windows 10 Home that was registered to the motherboard, at some point in the past, someone installed Windows 10 home and it is carried along through time, tied to the hardware. I have sort of badly explained this before I expect, but the hundred bucks I paid for the motherbaord, cpu and cooler, included a free operating system that will last a couple of years, at least.
The sad thing about the current state of affairs with that free operating system is that Microsoft are pushing the underwhelming Windows 11 and although the ASUS Z270M is supposedly "Windows 11 Ready" it isn't. Kaby Lake being the seventh generation of the Intel core series is not officially supported, sure the motherboard has a connector for a TPM 2.0 module, a twenty dollar part, but Microsoft are currently insisting that they will only support eighth generation processors or newer, we will see if that position changes by October 2025.

That is why I titled this piece "a bridge not far enough" because by the standards and requirements that Microsoft (and Intel) are currently setting for OS compatibility, TPM and processor generation, millions upon millions of Kaby Lake and older machines will end up recycled, landfill, or unintentionally those tech giants will push more users away from Windows as linux becomes more mainstream. 

But what do I care?  

Week two of March is about to start and once again, I am looking for something to do....