Monday, November 27, 2023

The cost of gigglybytes Nowadays.

Around this time in 2004 there was great excitement in life, well, when I say great, it was during my working life so most things of distraction were marginally exciting, and usually, anything acquisitional to do with technology would float my boat.

There was a need to transport files from work, personal files not work files, and Kingston Technology brought out their 1GB Datatraveller Elite. That was ONE gigglybyte, it was HUGE and in the Futureshop flyer they had a screaming deal, C$99.99 with a C$30 mail in rebate which I am sure you older readers will remember, buy something, send in the proof of purchase and the rebate form, wait patiently and it would eventually arrive long after you had forgotten about it.

There it still is, nineteen years later, on the right complete with free lanyard and Canadian Tire fishing lure doobery to stop me from losing the top.


To the left of it, you will see my purchase this weekend, Black Friday or whatever they want to call it, Staples brick and mortar store near Victoria, C$9.99 each....

Ignoring taxes, the gigglybyte comparison is rather impressive, it was, nineteen years ago, C$69.99 for a single gigglybyte and here and now, C$0.078 or 7.8 cents, which is a lot less, 896 times less. 

This is a handy statistic to hold in your head for the next time someone mentions down at the brewery how much beer was twenty years ago, or how cheap shoes, tee-shirts or hoodies used to be, it is true, things used to be bigger when we were kids, take Wagon Wheels as an example, they're positively tiny nowadays compared to what they were back when my hands were half the size.

Ok, I don't know what my point was now, I just want a Wagon Wheel. 

Sunday, November 26, 2023

Inevitable progess?


Presenting an ACER Nitro 5 Intel i5-8300H with Nvida GTX 1050 Ti. The first computer in this house to be running Windows 11, version 23H2 and unfortunately this "progress" is inevitable because of the imminent demise of Windows 10 as I will attempt to explain.

I have been thinking for a year or more about my next steps for my daily computer, I have always run a laptop for most of my needs, and I have a separate, more powerful computer for gaming.  It is an unfortunate fact that Microsoft is once again murdering their baby on the 14th October, 2025 and replacing it with an intrusive, highly controlling, operating system that has strict hardware requirements. That being said, they are replacing an already intrusive operating system with something more intrusive and restrictive and it is a fact that Windows 11 will not work on processors older that eighth generation and computers without a specific generation of TPM module.

We reluctantly moved from Windows 7 and grumbled, and it is merely history repeating itself now, and there are rumours of Windows 12 being released before the demise of Windows 10, a sort of reflection that every other release is a good one, a bit like Star Trek movies, although that paradigm has been broken with the last few movies being pathetic and cartoonish. I have heard bad rumours about Windows 11 but it only seems fair that I should try it for myself.

I don't mind improved hardware, but I do mind Microsoft forcing me into it when I can get by with perfectly adequate older stuff, so in the meantime...

Step one has been going on for almost a year now, I set up a Linux OS computer for appraisal as a "daily driver" trying one version and then taking advice and settling on another. It was noticed during the year that the little NUC computer we have attached to the TV for streaming was being bogged down by the various "secret" windows updates in the background, so about a month ago, let us call it step two, I created an identical NUC but with Linux installed. These two machines have been ticking along nicely, doing what is expected, they wait patiently when updates are available for user permission and there are no windows shenanigans...

Step three to improve things took place this week. I run Windows 10 Pro on a Lenovo T530 laptop, specifically that model as I like it with the backlit keyboard and if we look at the age of it, well the processor is from 2012 and an i5-3320M, Intel Ivy Bridge and over the last few months Windows has slowed, as it does so it needs a total refresh. In terms of Microsoft's plans and industry opinion, this laptop is obsolete, yet it is, in my humble opinion, perfect for everything I need in a daily driver. I bought another from a chap in Victoria last week on eBay for the total cost of $65 and I have set up a fresh Windows 10 installation without compromising my existing machine, it is now fully functional, a clone of my older T530.

Step one, two, three all entailed a machine that will not officially run Windows 11 and I need to plan for October 2025, which will arrive quicker than expected, due to the odd nature of forward time travel in retirement. The Acer Nitro, being fully compliant with all Microsoft requirements for Windows 11 is a stepping stone, an educational computer to dovetail me into their new ways. 

The question is, will it be adequate for Windows 12 when it inevitably arrives?

Thursday, November 9, 2023

A Thirty-Eight Year Arc

In early 1985 I was sent to McDonnell Douglas in Long Beach, California to represent the Uk based APPH Stress Office for development of the US Navy Hawk Derivative, the T45TS, a jet trainer aircraft based on the BAe Hawk T.1 and my  responsibility was structural integrity of the main landing gear. That is just the background to the 38 year story arc I am about to tell, the story is a minutia from my life, but it reflects how our brains store it all, well, most of it anyways.

Hewlett Packard had brought out a couple of programmable scientific calculators in the previous years and several in the American design office had either the HP-11C or the HP-15C and the more affordable of the two, at seventy-five US dollars, was the HP-11C. In those days Hewlett Packard sold their calculators by mail order, or through specialist shops, and the one shop I frequently "window shopped" at was a camera store in a mall near to the McDonnell Douglas facility.

I was twenty-seven, I had some extra cash in my pocket and I went into this camera store, with full intention to buy the HP-11C Calculator, but instead was distracted by the latest Minolta Freedom camera which I eventually bought, focus free, auto flash and for small format 35mm cameras it was the cats ass as they say. I took a lot of good photos with that camera in the short time I had it, one day, while out with the other adventurers somewhere in Southern California, I put it down on a wall while I had a sandwich, forgot about it and walked away. I often wonder what images I lost at that moment, in the subsequent thirty-eight years it wouldn't be the last camera that went missing.

So, the Hewlett Packard was forgotten about and when back in the UK a month later I bought a TI-66 Programmable calculator, again landscape format, same capability as the HP-11C but input was algebraic, not RPN. I held onto that calculator for almost a year, but subsequently, it was lost through no fault of my own when my Mark V Cortina was stolen from a Liverpool car park outside an MFI furniture store. I had gone in after work to look for a coffee table, good job I did not buy one because when I came out, the car, and my briefcase containing the TI-66, were gone.

A week or so later, I received a phone call at work, someone had found the briefcase on the shoreline, my paperwork and reference books were still in it, but the calculator long gone, I picked the case up and did not give the guy anything, mainly as I suspected he was probably linked to the bastards who had stolen the car, perhaps I was wrong about him and he was just a good samaritan in the right place at the right time, cynically I suspect he was just attempting to steal another quid out of my pocket.

So, I could carry on for the other thirty-seven years, but to end it here, the arc is complete as in the last month I have bought myself the HP-11C calculator and the owner's handbook. The total cost for the pair works out at a cash deal with a local seller of $50 for the calculator and via eBay, a price of $38.73 for the book, making a grand total of $88.73 which is in good old Canadian dollars, about sixty-four of those US dollars, so in reality It looks like I saved myself eleven bucks by waiting, however, looking on eBay for the box, if I ever want one, it looks like I will certainly blow the budget....

Monday, August 7, 2023

Waveform generator Kit build

The Bitscope has a wave generator built in, but I felt that, as part of my soldering apprenticeship, I should build a kit that would add to the understanding of an oscilloscope, so I had ordered a five dollar XR2206 based waveform generator kit which arrived last week and we will travel through the gauntlet of welding it together. This is basically what you receive in one of these kits, components, main board, case and difficult to read instructions :


The components, along with an acrylic case to hold the item. What is not shown in the photo is the missing fifth non-polarised capacitor which I later found stuck up on of the knobs. Twenty-eight components and a case. There would be over seventy soldered joints to be done and I was surprised how my skills have improved over the last few kits.

In true Blue Peter fashion, here is one I made earlier:


I mean ok, some things were not perfectly aligned, but that is the nature of these fiddly little kits, they are large enough to be completed, yet small enough to be difficult and frustrating. However, a pat on my back for completing this with my sausage fingers and increasingly dodgy eyeballs.


The case almost made me lose it, perhaps I was approaching the end of my patience after soldering everything, but the case components needed to be stripped of their protective paper, and then the uncooperative puzzle needed to be assembled. It was indeed a wriggly little thing and some of my slightly off tolerance soldering of the bits came back to haunt me. 


The input was supposed to be 12V but to test I used a 5V supply, but that was enough to prove that the new gizmo worked. I tested later with the correct voltage and the output was definitely better. The kit was completed in about an hour and a half, it would heve been quicker if I had found the missing capacitor before I started, it would have been less frustrating if I had more accuracy in soldering a couple of the larger items, the power input and the potentiometers which had a direct effect on assembling the case, but it was done, and I was happy.

It has been a good week, the eureka moment with the Bitscope and the success in the waveform kit.

Wednesday, August 2, 2023

Bitscope BS10

The electronics journey is continuing and I worked out my multimeter needs, my bench power supply requirements and I decided to investigate oscilloscopes. I have to admit, I am mostly clueless about all of this, brain the size of a planet but it is becoming more and more unwilling to allow things to stick, sort of a low gravitational pull, things land in there and then bounce right off into space.

Multimeters, Bench power supplies, oscilloscopes. The amazon marketplace is an absolute quagmire full of questionable products, so for weeks I was looking at oscilloscopes, digital ones, and I was contemplating a used Tektonix TDS 1012 from eBay, sourced from a Vancouver university and probably fifteen or more years old, and on the other side of the coin, a new Chinese import on amazon, both of which would be setting me back around two hundred and fifty buckeroonies.

The Chinese unit by FNIRSI, named I assume by throwing a bunch of random scrabble tiles at a fast moving bucket full of poo, was a contender and as prime day arrived the price came down a little, but I have faith in my fate and I resisted. 

I was off at the swap and shop, talking to the retired electrician, and he mentioned a contact on used Victoria, so I logged onto the website and found him, and we had quite a good chat about oscilloscopes. The chat made my enlarged brain think more deeply and I was in doubt about the meaning of life, the origin of all things and the existence of toast. It seemed to me after the large thunking session, that an oscilloscope would take up a lot of real estate on my finite sized bench, and right there on my workspace was a keyboard and screen in the form of my laptop, so perhaps there was another solution?

It was a fortunate moment, for there on the auction site was a thing called a Bitscope, an external piece of hardware that would interface via USB into a computer and the software would create a DSO or Digital Storage Oscilloscope, in effect a solution for my needs and limited desktop space. In addition, the used unit would only end up costing me ninety dollars, a definite incentive for purchase and investigation.

It took a week of brain stretching before the eureka moment, but the understanding landed on the surface of my brain and I hope it will create a colony there. In the photo above you can see the size of the unit, hooked into my little laptop and recording two channels of signal from a simple hookup onto a little motor, with power from that cheap bench supply magnified an extreme number of times to show the ripple and the noise. The Bitscope is a capable device and instead of me throwing words at the screen to describe it, I think an annotated photo of the innards will explain far better than my extended mumblings.

It is indeed an amazing little device and the software works very well. I hope that my learning will continue and I can make good use of it in the coming years, also included was a BNC adapter, so I will be obtaining "real" oscilloscope probes from the far off lands, in fact, one is probably on a camel plodding over the Himalayas as I type.

One last thing, this unit also has a waveform generator built in, which is very important because when you have nothing to do you can connect it up and spend hours just staring at pretty little graphs on the screen and marvel how much more intelligent you are than a tree stump.

Monday, July 24, 2023

Another Bench power supply

I say another bench power supply, but I don't think I did a blog on the first one, let me check....

There is something about having an electronics hobby that seems to encourage buying more of things, I bought six or more multimeters before settling on three that I now use, the others have been sold back into the marketplace, a couple still lurk around the house, but they too will probably be sold, I say probably as it is perhaps wise to keep back a sacrificial multimeter for bonfire night, whatever night that might be.

I digress.

The first bench power supply was a KORAD KD3005D that I bought from Digi-Key and it is a 30 Volt, 5 Amp unit, is a well built, accurate, linear unit that is my primary supply. This blog is not about that one because it is somewhat boring.

The one I will talk about is a project right out of the box, I knew that when I ordered it, so it will be a bit of interest for the blog, it too is a linear type of power supply, not a switching supply, but not as sophisticated as the KORAD, which is saying little. The second power supply does not really have a brand name, more just a model number of 1502D+, and don't ask me what the plus is for...

It was for sale on Amazon and landed cost at the Ponderosa was C$52.63 which was about a third of the cost of the previous unit from Digi-Key. The model number gives it away, it is a 15 Volt, 2 Amp unit for a grand total of 30 Watts output. I had learned before ordering that the ripple on the unit is perfectly fine for hobby use but with a little spike on startup, so I will keep that in mind. The main issue "out of the box" is that the simple design of the power supply produces 20 Volts before regulation, so even when running low voltage output at two Amps, the core 40 Watts needs to be dissipated via the 2N3055 transistor, and I can vouch that produces a fair bit of heat, in fact, a lot of heat... 

The temperature of that little transistor is far too hot for my liking and by design there is no internal fan to remove the heat (although in the manual, it indicates there is) so I will follow the path of another owner of this starter bench power supply (who made a video on Youtube) and in the next week or so I will obtain a suitable heatsink to increase heat dissipation, the installation of which may be the subject of a future blog, once I have worked it all out of course.

Monday, June 26, 2023

Answers on a postcard please...

Another weekend goes by and one of my favourite sellers at the flea market had a few items from a late tinkerer called Bob. It seemed that Bob was always playing around with electrical stuff and for just a few dollars, some oddities came into my possession, with no intended purpose besides curiosity. 

It seems that Bob liked to work with wood as well, basically "bread boards" for his electrical projects which is where a lot of circuits were tested out in the early days, then in the 1960s solderless breadboards, like the ACE 200k unit shown in the photo, became a lot more convenient for learning the hobby and testing out hair brained schemes.

A couple of DC motors, the little one has a pulley on it, the bigger one has a propeller and some good quality alligator clips. The other thing of interest is the over designed bank of resistors. It is a fact that once you start collecting resistors it becomes strangely addictive, difficult to resist. I like these ones, they will look good in the collection. I like sausages as well, although they are quite difficult to collect.

There were some other things too, a few solar panels and a nice tool box for my soldering kit, a whole bunch of things that I am hoping will keep me busy in the fall and winter, although I suppose solar panels will be of little use in the shorter days but here, now that summer has arrived, there is no urge whatsoever to sit at my bench fiddling with resistors and light bulbs, but that will change.

The sun is shining and the garden calls, I will do some painting today, and the things that once belonged to Bob will wait their turn until later in the year, although I may put some voltage on that ACE circuit to see what those three LEDs are supposed to be doing, perhaps that will be the subject of the next blog.

Monday, June 5, 2023

Another month, more multimeters

A few days into the new month and another vintage multimeter arrives on my bench, obtained from an electrician who is paring down his "collection" and on first inspection, this multimeter looks very much like the horrendous Chinese death trap that I bought a few months ago, and subsequently sold in a hobbyist kit on marketplace. The new acquisition was obtained for seven dollars and I could see my wife roll her eyes as I gladly paid for yet another multimeter, but hey, come on, seven dollars.....

Now, not to be too excited, the vintage leather case is not the case for this particular multimeter, I suspect it is a case from a 1950's analog multimeter, genuine hide leather, the way they used to make them when there were less cows on the planet, that's an interesting concept right there, nowadays there are more cows, yet inversely, less stuff made from real leather?
The great reveal, a Gardener Bender GDT-190A. I deliberately added an extra letter into Gardner there, just because I think it sounds rather rude. Anyhoo, the old 1995 multimeter resides in the older multimeter case, the unit is in like new condition, which sort of reflects on how little the seller used it as he plied his trade. It was probably "special" so he deliberately ignored it over the years...

The similarity to that cheap and not so cheerful Chinese facade of a meter is very apparent, however this meter itself is very solid, has a good, genuine weight to it, no sense of disappointment, yet it was still made in China. It could have been the unwilling prototype for all the "830" type multimeters that they flood the market with nowadays, selling exploding mousetraps to all the fledgling electricians. It is apparent that Chinese crap in 1995 was far better than present day Chinese crap.

It was little bit of a struggle to get the back off, but now I know how, but will forget before I take the back off again at a future date. The internal electrical bits and electronics gave me a warm sense of happiness, and everything seemed to be in order, except for a couple of the soldered joints which appeared to have been done blindfolded or while juggling. I ask for forgiveness in saying that, I am an old white guy and was brought up in a certain way, during my apprenticeship, juggling while welding was discouraged.
A single fuse for the 2A current check, the typical shunt and next to that, three well soldered probe connectors, very sturdy. A little spring next to the large L7106CPL L9625 chip contacts aluminum shielding tape on the back cover and it is obvious where a good portion of the extra weight comes from, more robust circuit board, case plastics are thicker and a good portion of "real" electronic components including an IC the size of a small planet. 

The manual was very informative with diagrams, industry quality text and good sized fonts, the PVC test leads are typical of the time, but felt as though they actually had some copper running through them, nowadays the manufacturers produce test leads that sell for virtually nothing, so you can understand why they would not want to include any valuable materials. 

The overall impression was that, in relation to modern day offerings of this type, this particular model is a better alternative for home use, hobby type DC use, Arduino etc. I would still be reluctant to place the probes into a high current situation or an AC receptacle without using a robotic bomb disposal vehicle, but that is just me, crazy old tech geezer who wants to be older.

Laters....

Tuesday, May 16, 2023

Multimeter Madness : Circuitmate DM15B

In a few weeks time there will be the big neighbourhood yard sale here, so I am looking forward to sharing some of my electrical finds here on the blog. I will admit that my last blog about the cheapo multimeter left me feeling rather sad, mainly because those dangerous Chinese multimeters have flooded the market, and will continue to as long as idiots like myself want to buy one "just to see how bad they can be" so I blame myself for all the ills of the planet, it is all my fault and I apologize.

I wanted to balance things out by buying a few vintage homegrown multimeters, they don't have to be manufactured in Canada or the USA, but some will have been designed on this continent in the last thirty or so years, perhaps even older, and some will be marketplace finds like this one :

This was a great find on marketplace last weekend, the owner sold it for two bucks and made a caveat that it "kinda" worked. It was on our route so we picked it up from his house, dropped a tooney in his postbox and made off like a thief in the night, or day as it was. It is a Beckman Industries Circuitmate DM15B, designed in San Diego, California and manufactured in Taiwan around 1985. In addition it came with some nice Pomona 3782-36 Minigrabber Test clip to stacking banana plug leads, 36" long and I'm not sure which part of the deal makes me happier, the multimeter or the leads.

Pomona Electronics was a company specializing in electronic test equipment and accessories, apparently it was acquired by Fluke Corporation, and as is the state of companies in the states, Fluke is no longer owned by Fluke. The test leads have Pomona on the wiring and possibly date back to the mid 1980s, they are, like the multimeter, in great shape.

After placing a fresh nine volt battery in it and giving the multimeter a slight clean, it kinda worked extremely well, very well in fact and my overall impression of it is it is a solid little device, same size as that abhorrent depressing thing that I reviewed in the last blog, but this one actually has a fuse and solid as a little rock, and I may be going on a bit but those test leads are a very nice addition to my collection. I did some testing, voltage is accurate, continuity buzzer a little buzzing wasp, and resistance testing as accurate as I need it :

Testing a 1k ohm resistor, 991 reported, within a percentage of actual value, I repeated the test for a whole range of resistors and accuracy was very good between 10 ohm and a million. I like the feel of these older meters, something to do with the weight I suppose, plus overall this Circuitmate appears to be very well built, and I suppose because it is almost forty years old and still working like a champ, that is proof of how well it was constructed.

I am very happy with the test leads, did I mention that?

I am therefore no longer sad, I am happy and my faith in life, the universe and everything has been restored once again. 

Thursday, April 20, 2023

Comedy : The race to zero and why we should never be surprised by crap

I may have mentioned it a month ago, but to remind you, my invisible people, I ordered a quite well-researched cheapest multimeter from the far off lands, the price, including shipping, was just four dollars and seventy four cents of our Canadian money, I was curious, how bad could a multimeter that costs about the same as a deluxe coffee actually be?

I researched it, sort of, and ordered it, and waited...and waited....

It arrived, they mostly do, from the far off lands, and it weighed, well, it weighed very little. No ballast to make the thing seem real, but oddly, once a battery was inserted, which still made the thing appear to be lighter than air, the product seemed to do most things that it was supposed to do.

Most things.

No fuse, no beeps, very questionable triode detection. It was obvious when removing the back cover to place the nine volt battery that there was neither a fuse, nor a beeper unit and if you look at that ring of 8 holes for the transistor testing, well, you can understand why the three prongs of an NPN or PNP would have difficulty making contact all at the same time. However, to temper my rage I looked at the original listing and saw that neither a fuse or a buzzer were promised, the wording, the reviews, all pointed to the glaring fact that this was potentially a death trap that had no bells or whistles.

I know enough stuff about electrical things now to be dangerous, so looking at the above photo I can point out the shocking detail of the no fuse, where perhaps a fuse should be, so the question then would be, how would this little miracle react to bad things happening in the real world, and the answer perhaps does not require any training in rocket science.

The two main probe contacts, bottom left, well they are extremely close for potential arc points when high voltage AC or DC are applied and when installing the battery it actually pushes them closer, so there is one dangerous point of failure, another would be one of those many surface mount resistors, a mystical point of magic smoke when you jam one of the inadequate, poor quality, probes into an AC outlet. In essence, there is a fuse, just not one you can replace...

What do I know, what do I care, I cannot even buy a pint of beer any more for the price, and this little, lightweight, wonder can be used to check "little" things and can perhaps be used as a sacrificial multimeter when I do not wish to risk a higher price unit, after all, a replacement fuse on a good quality Fluke meter would probably cost twice what this little hampster costeded.

I will admit though, when I opened the package from the far off lands, my first reaction was to immediately send this to the e-waste depot, but you know, with a little time, you realise that you do get what you pay for, and if you pay next to nothing, you get next to nothing.  

I subsequently sold the little meter, I included it in a small toolbox of spare, useless, parts. It was interesting to hold and play with such a poor little multimeter, and in my research along the way, I have discovered that the terrible internals of this type of meter are sold in many different ways by our far off friends, perhaps it is in their interests to electrocute us all.

Ok, now I have rid my world of that sordid little thing, I should go and buy another....

Monday, April 17, 2023

Flip Flop LED breadboard

In the growing supply of kits I have waiting to hone my soldering skills, there are two very simple ones, they are what is called a "Flip Flop" circuit that utilizes two LEDs, two transisitors, two capacitors and four resistors. This is the circuit diagram :


There is a logic afoot within this circuit, and I will attempt to explain what it does, in simple terms it flashes two LED bulbs and most brainiacs will say that it is indeed a very simple circuit, but for me, it was a challenge to get my pea-sized brain around it all, mainly as you can buy flashing LEDs for pennies, however, flashing LEDs also make use of a miniature transistor circuit that is contained within the LED housing.

Here is my attempt at explaining, it might be wrong, but the idea is in my head and I may as well write it down so that in the future I can look back and scoff at how little I actually knew at this point in my education.

The circuit calls for two BC547 transistors which are NPN and the capacitors are connected to the base on each, think of the capacitors as little batteries that cycle from uncharged to charged and when "full" discharge and open the transistor switch so that the corresponding LED can receive current and lights, when the capacitor is discharged, the transistor base is not powered and that LED switches off. While all that is going on, the other capacitor has charged and then provides base current to the other transistor and the other LED lights, this backwards and forwards action continues, so the two LEDs flip flop.

Suitably vague?

I breadboarded the circuit using components out of my supplies, so the transistors used were ZN 2222A another NPN type and the capacitors were 10/35 which are 10 microfarad, as they say, who dares wins and I didn't have the correct components (a bit of a lie, I did, but they are part of the flip flop DIY kits I have purchased shown in the photo) anyhoo, that is what I used for the breadboard experiment.
The kit, shown on the left, will be the next step, cost was a dollar from the far off lands and I bought two, in case my big sausage fingers and soldering incompetence get the better of another set of components. The breadboard was set up and it was happy times as the flip flop worked with both 5V and 3.3V - as usual, I called my good lady out of her happy place and showed her my flashing lights and she said "That's nice dear" and went back to doing whatever she was doing before being summoned by her mad scientist spouse in his thousand year education towards building a hadron collidor.

Tuesday, March 28, 2023

It works! - Nay it disney!!!

The first soldering kit I have ever attempted, a little two dollar unit from the far off lands, I bought it a year ago, so I decided to hone my soldering "skills" for an hour, and it was an hour or more, and when all was done and dusted, the unit worked...

Keen eyes out there may notice there is a capacitor missing from the photo, more on that later.

I'm showing the best side, the soldered side is better left alone. When connected to five volts eight out of the ten LEDs did what they were supposed to do, react to sound via the onboard microphone, and two did not do anything. I saw it as a win, not a total win, but 90% success is what I call great for my first, nervous, time.

Later on in time, I noticed from the above photo that the top left pin of the circuit chip was not making contact, so 15 pins out of the 16 had good contact, this was the probable cause of the two LEDs not doing what they were supposed to, however, in between the two points in time, I screwed something else up, typical...

I was taking a look at the two LEDs that were not working, perhaps I had put them in backwards, a sound reason for LEDs not making light, but as I was checking, I cracked the smaller capacitor solder joints, and for the life of me, over the next fifteen minutes or so, I could not resolder them back, the minute tinned pads on the poor quality circuit board were gone.

I think that is a common problem with the circuit boards for these very cheap kits, but it is also a problem with people like me, who cannot solder for toffee, spending far too long with heat on the pads, basically removing any possible contact points, I will reset and learn, and order another one of these kits from distant lands.

So, it was (almost) working, and now it does not, probably a familiar tale over the next few attempts at learning to solder better. I have learned a lot from this first kit, eyesight could be better, dexterity too, patience can be improved and getting things right the first time would be a good idea.

Nothing ventured, nothing gained.

Sunday, March 26, 2023

Inside a Radio Shack 22-032A battery meter

Another handy little meter that I've had for years, so I thought I would take a look at how it ticks. This follows on from my previous comments about multimeters that have battery testing capability and basically there is a difference between the two devices. Testing a battery purely by voltage is not a reflection of the battery health, so it is important to place the battery under load to check. In the case of a battery meter like this one, that is achieved by turning the dial which places an appropriate resistance in the test circuit.

Inside, no battery is needed as the unit uses the tested battery to provide current. I expected to see the calibrated, analog moving coil meter of course and a series of resistors linked to the rotary dial positions, that would be about it I would think, no fancy integrated circuits, just an application of good old fashioned V=IR in a handy little unit, so I took the back off to have a fiddle around. 
As predicted, twelve resistors (for nine dial positions) and annoyingly, some resistors are in backwards in relation to others, so it makes interpreting the bands a little difficult. I checked all the resistors with a multimeter and they were approximately what they should be, within reason. Instead of making a list of the resistors (and their variance from the stripes) I made a table of dial position and resistance recorded at the probe level for both the Neoteck and Klein Tools multimeters.


The dial position selects a resistor, or group of resistors and then the magic of V=IR comes into play for the moving coil meter and full scale deflection if the loaded battery is good, there is some other aspect coming into play for the button cells and AAA and AA cellls, but I was unwilling at this time to remove the meter label or the circuit board to see what jiggery-pokery is happening on the reverse side with the traces and perhaps a couple more resistors, or reuse of one of the twelve. I was tired and I needed a beer and there was also that chance that I would not be able to put it back together again and it would be a battery meter no more.

Suffice to say, clever, yet simple device, it is a shame that Radio Shack no longer exist in the form that they did a decade ago, but there were similar devices branded Micronta in the years that followed their closure and transition into the Source.
 

Thursday, March 23, 2023

Multimeter musings, Part Two

The second multimeter review, of sorts, is regarding the second multimeter that I bought perhaps a decade or more ago, and this too has a "name brand" associated with it, but in essence is another of the peripheral peripherals away from the key players. If you take a moment to peruse any online marketplace, you may be shocked to see how many options there are, and if you journey to the Chinese markets, the amount of options triples, but fundamentally, most of the cheapo options are the same thing. I have ordered such a device for the princely sum of $4.91 which includes everything, including delivery by the most excellent, slowest, method.

Enough of that, here is the subject of todays lighthearted investigation:

It was about $25 back in the day, the brand is Innova Equus, model 4320. I think I bought it at around the time when I replaced the O2 sensor on the car, I had bought an Innova CanOBD2 Diagnostic tool, so it was a happy acquisition time. The manual on this one is rather better, a readable font, that is all we can ask for, and clear instructions, except for that big green block called BAT load test, I must be missing some brain cells because it does not appear to work...

The way to test a battery is not just to check the voltage, because often, a depleted AA battery can still show up to 1.5V but that will drop if a 100ohm load is in the circuit I was excited about another way to test batteries, but this multimeter seemed to ignore my excitement. I followed the manual, had the leads in the right place, turned the dial and the display always says the same thing regardless of connection to batteries, I assume that the resistance is on a dry joint within the casing, so I give up on that and use my battery tester instead.

Comparison of the Innova with the Neoteck. The orange rubber bumber will actually fit on both, but I prefer it on the Neoteck. You will see that the common post is central on the Neoteck and on the right hand side of the Innova, that is fine I suppose as long as you remember, on the expensive Fluke meters, it is usually in the middle. 

There is a 250V 315mA fuse on the back of the circuit board and a familiar brass rail shunt. The fuse is easily accessible and in a clip type holder, far better arrangement than the Neoteck.

The other side of the circuit board shows better quality control, although not so much for the BAT testing circuitry I suppose, if I was more skilled at this electronics game I should be able to troubleshoot, but I expect at my level, I would end up making things worse, so I will leave it alone. The beeper is far better on this one, the overall impression is that there are better solder joints, no evidence of flux all over the show, a better display housing, held on with 4 screws so it would take more of a drop I expect, the test lead posts are quite sturdy and better material, overall an improvement on the Neoteck.
In terms of the multimeter standings, the Innova quality is better than the Neoteck, so for that, number two is in first place, and number three in second place, but there is a however.

The Innova is let down by the flawed BAT feature, I know I am sort of going on about it, but that represents 30 degrees of the dial real estate, this could be chased down, especially now I have two digital multimeters, however I choose to live without battery testing on this unit. There are aspects of the Neoteck that I like, the rubber bumper, the crocodile clip leads, but I wonder in a decades time, because of build quality, will it still be as useful as the Innova.

As they say, only time will tell.

Wednesday, March 22, 2023

Multimeter Conversations, part one

 In 1984 a group of us working at APPH, the landing gear factory, perused an electronics catalog and we saved on postage by buying things together, it was a wonderful day when things arrived and I was in possession of my first analog multimeter. I may do a blog on that one, later.

This blog will be about the third multimeter, recently purchased, and these conversations will be a review of the state of things out there in the market, because quite frankly, the multimeter market is a complete shambles and I hope to shed some light on that. However, multimeter number three is a reasonable surprise, and I know for sure that it is going to be better than a recently ordered multimeter number four and possibly a lot worse than multimeter number five, although because of timing and locality, five will probably be four.

Anyways, back to number three.

It was ordered from Amazon and was featured as a "warehouse deal" which means it had possibly been a customer return, the original "new" price, with shipping and taxes, being $31.35 and the "used" price was $22.08 so I thought, for shits and giggles, I would order it as a backup to my aging cheapo multimeter from a decade ago (multimeter number two) plus there were also crocodile clip leads included, which I wanted for my electronics studies.

It arrived, but was dead as a dodo, however, I quickly found that it was the included nine volt battery and replaced it, all was good, but I thought I should contact Amazon customer service and have a grumble. I have found that with the big companies, grumbling is often a satisfying way to reach a state of ungrumble, so with fair difficulty I ended up in online chat with a representative with a distinctive foreign sounding name.

After quite a short whinge, the chap said I could return it, free of charge, or if I chose, a partial refund would be given, so I picked the latter and he awarded me a twenty percent refund of $4.40 and asked if that was satisfactory, I said yes, and then to my surprise he also gave me a $5.00 courtesy credit for any future purchases. Therefore, when all the dust settled, multimeter number three ended up costing a whopping $12.68 and that definitely ticked off the shits and giggles box.

The innards :

The little motherboard is not that bad, most of the solder joints look fine with some voids, perhaps some are a little dull and the cleaning process, to remove any excess flux, left much to be desired. There are a couple of fuses, one glass 250V 200mA glass quick blow fuse in an interesting, soldered holder that will be a challenge to replace and a surface mount zero ohm resistor "fuse" or trace jumper as an overcurrent protector. Then the "brass rail" on the right hand side is a shunt so that the microprocessor can calculate amperage when the test lead is in the 10A socket.    

As usual with these Chinese testers, there is the epoxy "blob" on the left hand side there, that is the microprocessor that does all those basic electronic calculations based on lead input and selector position, just the basic formulae that we learned at trade school with mostly acceptable accuracy.

Overall multimeter three is of reasonable quality, materials are ok, soldering is fair, features are ok and I expect for the price, that is acceptable for a little hobby unit, the little manual, with the smallest font known to man, not so much when you have ancient eyes like mine. As for longevity, well it will be used for my light electronics, arduino and breadboard use, so no danger there, will I be using this one to test mains voltage?, well highly unlikely, I will not be sticking those test leads into any receptacle because I suspect that magic smoke may appear and possibly the smell of cooking bacon could be a possibility. 

Tuesday, March 7, 2023

The first Kaby Lake machine, a bridge not far enough

The first week of March has vanished...

I originally bought this case about 18 months ago, time indeed has been vanishing at an alarming rate. I blogged about an ASRock B450M build that had many issues because of the motherboard and incompatible or dodgy ram, so for that time the case was shelved, unwashed, unwanted, a case without a heart, but with promise.

The ASUS Z270M mATX motherboard that I bought a couple of weeks ago, but not told you about, was the perfect size for this little case, it included a seventh generation Intel i5-7500 processor and stock fan. The level of processor, nickname Kaby Lake, inhabits the same LGA1151 socket as the previous Skylake generation, so this motherboard allows for both generations and supports DDR4 memory. The differences between the Skylake and the Kaby Lake are probably important to Intel, but performance wise for the rest of us, let us just assume that with typical tick-tock shenanigans, the newer generation processor will be about ten percent faster.

I heard you ask "faster that what?" so I will reply "Yes, exactly"

It matters not, because all I want to do is have some fun, and you know, oddly, I have a feeling that I'm not the only one. The only fly in the ointment on the motherboard deal was that it did not have an IO shield, so a few weeks back I ordered one from eBay and the postman brought it yesterday.

Although this case was thirty-four dollars, which by todays post-plague standards is an absolute bargain, it is however a little flawed in design for building a classic computer. That front panel is not a door, there is no provision whatsoever for an optical drive, the top of the case has a magnetic dust mesh, which struggles to stay in place, and the second mesh, below the power supply, wriggles like a dachshund in a sausage factory whenever the case is moved. The other issue is that the motherboard standoffs have slight tolerance issues, so not all mounting screws could be used.

However, it is a case to store stuff in and occupy my time here in the laboratory.
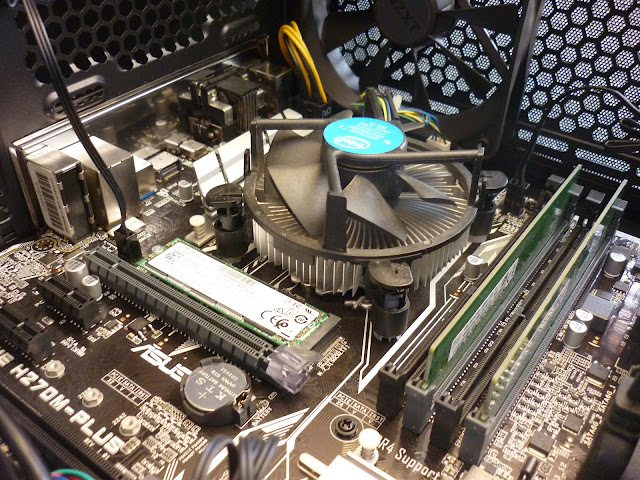
You will see to the left of the CPU cooler fan there that I installed a 128GB M.2 NVMe boot drive onto which I stuffed the (free) Windows 10 Home that was registered to the motherboard, at some point in the past, someone installed Windows 10 home and it is carried along through time, tied to the hardware. I have sort of badly explained this before I expect, but the hundred bucks I paid for the motherbaord, cpu and cooler, included a free operating system that will last a couple of years, at least.
The sad thing about the current state of affairs with that free operating system is that Microsoft are pushing the underwhelming Windows 11 and although the ASUS Z270M is supposedly "Windows 11 Ready" it isn't. Kaby Lake being the seventh generation of the Intel core series is not officially supported, sure the motherboard has a connector for a TPM 2.0 module, a twenty dollar part, but Microsoft are currently insisting that they will only support eighth generation processors or newer, we will see if that position changes by October 2025.

That is why I titled this piece "a bridge not far enough" because by the standards and requirements that Microsoft (and Intel) are currently setting for OS compatibility, TPM and processor generation, millions upon millions of Kaby Lake and older machines will end up recycled, landfill, or unintentionally those tech giants will push more users away from Windows as linux becomes more mainstream. 

But what do I care?  

Week two of March is about to start and once again, I am looking for something to do....

Monday, February 27, 2023

Snow on the ground, so what is on the bench today?

It is already the end of February, and winter is still clinging on by delivering a few centimetres of snow and a wicked wind that means shorts and sandals are out of the question, so a marginally warmer option is to hang around my bench in the garage and tinker with the compute thingies.

This was part of a lot I picked up at the weekend for what is becoming the usual amount of cash that tempts people to part with stuff they spent thousands on seven or eight years ago, the one hundred dollar bill.This post will be about the "not working" motherboard, cpu and ram, and the next blog entry maybe we will take a look at the magnificent Corsair ATX tempered glass case that came with this lot.

The computer had been stripped apart and the seller said the motherboard was probably the only thing not working and he also said there was no guarantee on anything, fair enough, I haggled him down and we agreed on that enormous amount of cash that won't even buy a decent pair of sandals nowadays.

The motherboard is an ASUS Maximus VI Hero Z87 and I was hoping it could be debugged as I expect it has a Windows 10 Pro licence in the UEFI and of course, proving something works when someone insists it does not is always a satisfying occupation. The motherboard has an Intel i7-4790k cpu installed, probably the best cpu for the era on this architecture with the Z87 chipset, and if I pair it up with a reasonable video card, this can be the basis of a good gaming machine for medium settings, 1080p.

I installed a stock cooling fan, reset the CMOS and used some known good ram, and it posted first time, then when I installed the Corsair ram that you see in the photo, initially it failed on post and subsequently after seating the ram correctly, it made it to the BIOS screen. This is my issue with the bulky ram that has aesthtic heat sinks attached, they are often difficult to seat correctly in the slots.

The next step was to test the EVGA 750W 80 plus bronze power supply that was bought as part of the lot, and yes, that too was good and the conclusion was that all the components bought at the weekend are working. The final step was to see if Windows 10 Pro was registered in the UEFI so I attached an SSD and installed the operating system, which always takes a little time.

I fully expected that a Z87 motherboard with an i7-4790k would have Win10pro, and that was correct and it was added to my online account, activated, and now it is time to take the assembly off my bench and file it away until needed. I have a case that I could install it in, however, there is currently no IO shield, so I need to buy one of those from the distant lands, to be loaded on a camel or donkey and for it to traverse the mountains and fiords before there can be any progress on the build.

I look out the window, the snow is still on the ground, perhaps when that IO shield arrives, spring will have sprung.

Friday, February 10, 2023

Yamaha RX-360 Backlight

In my gaming room I have "old faithful" which is a 30 year old Yamaha RX-360 Natural Sound Stereo Receiver. I use it for my CD Player, Turntable and gaming PC. I moved the amplifier a bit and the backlight for the display went off, I thought to myself that it was the end, a very sad moment. However, I did a little research and found out that it was probably just a tiny incandescant bulb that had failed, so I decided to replace it with one of the 5mm LEDs from the Arduino kit, which would require a bit of math and a modicom of soldering.

Taking the top of the case off showed the circuit board and the transformer, the voltage to the 4mm bulb was 14.4V and I did some research and the expected current required was 70mA. I removed the bulb and it was in bad shape, in fact the soldered contacts were deteriorated and broken. The bulb is shown here encased in a rubber grommit, but one contact was detached, and the second contact broke very quickly when I extracted the bulb.
I used a bread board to check out my LED fix, worked out a suitable resistor value using the magic formula of electrical loveliness and played about with a couple of resistors to obtain a suitable dimness. I am sure you will want to know the magic formula, and it went something like this : R = (V-Vf)/If and V being supply voltage 14.4V and forward voltage for the LED, Vf is 2.0V and then the forward current taken as 0.03 or 30mA. That gave me a value of 413 ohms for the resistor, but I decided to use a 1k resistor so the LED would be dimmer and perhaps last forever. It can be an exact science, but in this case, who dares wins.
It was then just a case of soldering the components to the power lines, using a little heat shrink and tape to keep things separate and safe. I was quite pleased that it was a tidy job and all that was left was to use the existing grommit and reinstall. I must admit that I am really quite crap at soldering, my hands shake, my eyesight is poor, even with reading glasses on, and I always feel the need to have at least one extra set of hands when doing something like this. You may notice that I did not put any tape, or heat shrink over the resistor, mainly as it may get a little hot under normal operation, I am sure there is another calculation to work the thermals out.
The resulting backlight is at a great level for my dark gaming room, and the entire process took about an hour, and I believe that this old brain learned a few new tricks in the process and I was suitably impressed with myself to want to show off again on the interweb here on the blog. The amplifier is reinstalled in my room and working fine. Happy days indeed and no money was spent.

Thursday, February 2, 2023

Deep Clean

A happy time was spent in the garage today, removing all the innards from the hundred dollar computer I bought on Sunday and giving everything a real deep clean. I was reminded about the attention to detail my good friend Graeme used to give when detailing his Honda Accord on Saturdays back in Ontario, and I said to Karen that computers are my equivalent of a type of cleaning OCD and it is not a chore, just rewarding fun. I just don't wear wellies when doing this stuff, just socks and sandles, the West coast way.

Side panels, front panel, front and rear fans, all corners blown out with compressed air and then a paintbrush to get all the skin cells, dust, DNA and boogers out from crevices. Then a wash down with a soapy flannel and left to dry outside by the car, which also will be having some soapy water waved near it in the next few weeks, weather permitting. I have also ordered some cheap front seat covers from Amazon, so I may do a blog entry of how well/badly that goes.
Opening the garage door reminded me that Spring is just around the corner, it wasn't a really cold day and there was a little sunshine, great day for blowing out the cobwebs. I finished up the deep clean and the next steps will be to reassemble the fans to the front and back, then install the ASUS Z170 motherboard from the build I did last week, it is a repeat of effort, but I think it will go well in this Corsair case.

There is something very special about these older Corsair and Cooler Master ATX computer cases, the gauge of the metal is a lot thicker than the modern ones, sure they are heavier, but I see that as a positive and want to have my personal computers in a solid housing. In the next few years I expect to buy a few more of these type of bargain units, there may be quite an influx of them around the end of 2025 when support for Windows 10 ends. It is interesting that on the last day of January, Microsoft announced that they are not selling licenses any more, the writing is on the wall for all of us who love Windows 10.

Windows 11 has (apparently) hardware demands that cannot be met by older motherboards and CPUs, even those from just five years ago, so I expect that there will be quite a few bargains in the used market as the deadline looms, and slowly my personal computers will improve, but will still very much be considered "old" tech.

There will be an unseen musical chairs moment as I deconstruct the very recent Rosewill Intel i5-6600k build and move it into this preferred case. I was going to do a blog about it but other things, mainly a new starter motor on the car, became a priority.

Tuesday, January 31, 2023

Ready Built Monster Haswell

Sunday afternoon I spotted a local advert on FB Marketplace, luckily before I had started having a pint or two, the seller had a computer, two monitors, a desk, speakers and other peripherals listed for $200 and I shot him a message about just the computer, mainly as I wanted the ATX case and the PSU. It wasn't long before he came back with $100 and that was a good price.

The outside pants went back on, I jumped into the car and went and picked it up. It is very true that they do not make cases like this any more.

On the bench, my bench. It is a magnificent, older Corsair ATX case, which will accomodate most modern motherboards and a 750W EVGA power supply. What came as a surprise though were the contents of the case, because without any interference whatsoever from myself, this was already a very capable computer, even in 2023 and I wonder why people sell them so cheap.
It is older technology, of course, but aside from the case and PSU, there is an MSI Z87 G45 Gaming motherboard with an Intel i5-4670K quad core processor. The GPU is an ASUS Nvidia GTX 660 which I assume to be 2GB, there are 8GB of G-Skill Ripjaws X DDR3, and a Samsung Bluray drive. There have been a few updates though since it was originally built, an EDUP 1300Mbps PCIe wireless card and a 960GB Kingston SSD both of which will come in handy.

Add to all of that, a legal, activated version of Windows 10 Enterprise edition, which will travel with the motherboard if I use it again.

These components are destined to be featured here in future builds, I have blogged this for my digital diary, to remember the Sunday when my drinking patterns were disrupted and the internet made me change my pants and spend another hundred bucks on old tech. 

Sunday, January 29, 2023

Hello old, unused, friend

Sunday morning, breakfast was consumed and the coffee is being installed, so I was out at my bench and removed most of the innards from the backup PC I created in April 2021 and installed the Z170 motherboard with the i5-6600K and cooler, an M.2 drive a Gigabyte WiFi card. 

Yesterday we had an afternoon near Victoria and I bought a used Gigabyte GTX 1050TI graphics card and 16GB of ADATA DDR4 RAM, that I will run at 2133 MHz.  These were also installed along with Windows 10 Home edition, which is the digital licence that the UEFI carries on the Z170 board, so more value there with a free operating system that will be supported until June 2025

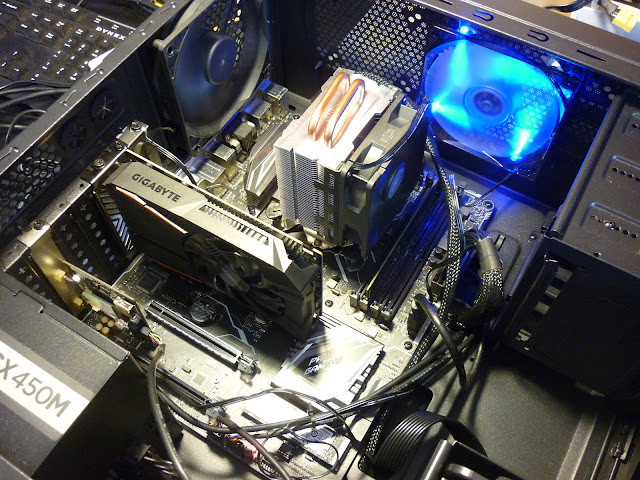
There it all is, installed in the Rosewill case, top down you can see the Cooler Master Hyper 212, a single stick of DDR4 memory, the Gigabyte GTX 1050TI which impressively does not need an additional power connector as it pulls all it's power from the PCIe slot. In addition, a feature of this card is that it has a 0db feature, it stops the fan when the load is low, so it is quiet. There right at the bottom right of the motherboard is a Western Digital 256GB M.2 NVMe drive, which will suffice for this backup build.

The post mortem on cost, I like this bit.

Case $35, NVMe drive $52, WiFi card $15, Power supply $60 which is all cash spent years ago so that adds up to $162 and I'll add a generous $15 for the fans, so $177 old money there. Then $120 for the motherboard, CPU and cooler, $90 for the GTX and $30 for the DDR4 (which was quite a deal) and that lot adds another $240 for a grand total of $417 which I think, for this level of machine in early 2023 is a very good value.


After installation of software and some testing, this box will go under my bench once again, it has been more "computer therapy" for me, will this build be needed in the future? - who knows, and who cares really and perhaps in another two years I will report that the computer is to be upgraded once more.

The other exciting part of this, is that I now have another set of spare parts that can be built into a case, and I think I have just the case to do that in....

Upgrading the backup PC

If you look back to my posts in April and May 2021, deep in pandemic territory, you will see that I was keeping busy by building a spare PC in case my main threw a wobbler, I said at the time that it would be placed in a home under my bench and I would move on to occupying my time with something else.

So that was then, twenty months ago, and my main PC has been upgraded and logically, the technology "width" between the two machines has widened. That was fine, but as I am always lurking on Facebook marketplace, I came across a very local deal on a motherboard, cpu and cooler combo.

That is one boring photo, but the anti-static bag is hiding an ASUS Z170 Pro Gaming motherboard with an Intel i5-6600K processor. The online deal also came with an almost complete Cooler Master Hyper 212 heatsink and fan, and for the record, the motherboard, cpu and cooler, cost me $120 and it was a short drive from the house.

In terms of computer history, the i5-6600K is from the third quarter of 2015, and it is a sixth generation Intel CPU, and they code named that series, Skylake. The ASUS motherboard is based on the Intel Z170 chipset and for this build, I will need DDR4 RAM, I have some, but again, I will go searching for more in the wilds. In general terms, the previous project in the Rosewill case was an Intel i5-4570, 4th generation Haswell CPU on an Intel Z97 chipset motherboard, two generations behind.

As I have discussed, is newer better? - if we look at raw numbers, the Haswell scored an average CPU mark of 5218 with single thread 2036 and this "new" Skylake contender for the crown, scored 6349 with single thread 2341. This indicates that the new one is about 20% quicker, but that is just part of the story as improved generations of Intel processors include other benefits, same cores, same threads, but with increased bus speed, DDR4 memory support and higher bandwidth. 

The Haswell and the Skylake packages include integrated graphics, and that too has assumedly improved between generations, but here is where Intel get convoluted again, the older processor has "Intel HD Graphics 4600" and the new one has "Intel HD Graphics 530" which sounds worse, however, as usual, Intel change their naming rules and the smaller number, oddly, is a lot better. It matters not as with this build, like the previous, I will be using a dedicated GPU which will be betterer.

It was time to dust off that old assembly and update.

Sunday, January 8, 2023

Intel(R) Core(TM) i7-3720QM CPU @ 2.60GHz

<geek mode on>

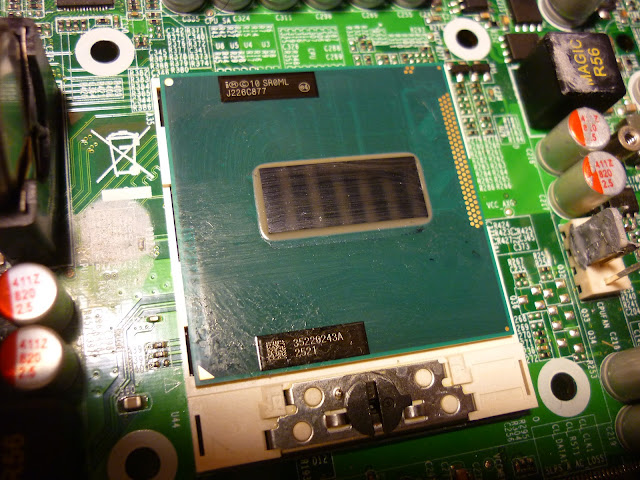
Went and picked up the CPU, a bargain at $40, installed it this morning in another NG9F-QM77 motherboard, something to do on a rainy Sunday morning. Up and running, all ok, same procedure as the other day so nothing to show, except for the size of the heat spreader, chip is same form factor but the heat spreader is a lot bigger :

The "old" Celeron 1020E was 22nm lithography, Ivy Bridge boasting a TDP of 35W and this i7-3720QM, same 22nm, Ivy Bridge, pushes out a little more at 45W and the heat spreader, or contact area on that mirrored plate in the middle there, looks to be about 50% larger.

Simple explanation of lithography is the size of the squares on the "graph paper" of the mask and that the smaller the number, the more densely packed the transistors are on the finished processor. However, the more I talk the more you will realize how little I know.

This Ivy Bridge designation, another of Intel's labyrinth of names, and to muddle it further, Ivy Bridge superceded Sandy Bridge, the latter using the tried and trusted tick-tock on 32nm lithography and the new and wonderful (at the time) Ivy Bridge uses FinFET (3D) Tri-gate transistors and is a die shrink for the previous code name, so it is still a "tick" and not a "tock" and is not a redesign of the architecture.

I read that the tick-tock process still applied and did not end until the 7th generation regardless of FinFET and that's when I lose (more) confidence in the internet, suffice to say Ivy Bridge was fundamentally the same as Sandy Bridge but the transistors were smaller. The NG9F-QM77 motherboards support both Sandy Bridge and Ivy Bridge in the G2 socket, it is logical that the best choice is the youngest, which happen to be more efficient than the older cousin.

The logic that younger processors are better can also be challenged, Intel went through a few generations of marginal, incremental changes, making newer generations better at a few things, but not all the things.

I took a look at what an i7-2720QM Sandy Bridge processor TDP was and the Intel spec sheet still calls out 45W but, the processor runs at 2.20GHz and if I compare passmarks, the Sandy Bridge at 2.20GHz comes in at 4069 (single thread 1376) and the Ivy Bridge at 2.60GHz (for the same TDP) comes in at 5679 (single thread 1870) so thermally, the Ivy Bridge are a lot more efficient. In the first hour or so of operation, I see under load temperatures of about sixty degrees centigrade which, is about ten degrees hotter than the i5-3230M, but not bad at all for a fanless PC.

Excellent stuff, I have learned something today, I had not realised that Ivy Bridge are backwards compatible with the Sandy Bridge (BIOS update may be required) and that they use less power per compute. In addition, Ivy Bridge is the last Intel platform to support Windows XP and the earliest Intel microarchitecture to support Windows 10, 64 bit.

I also learned that the internet talks a lot but does not say much, so I have that in common.

<geek mode off>